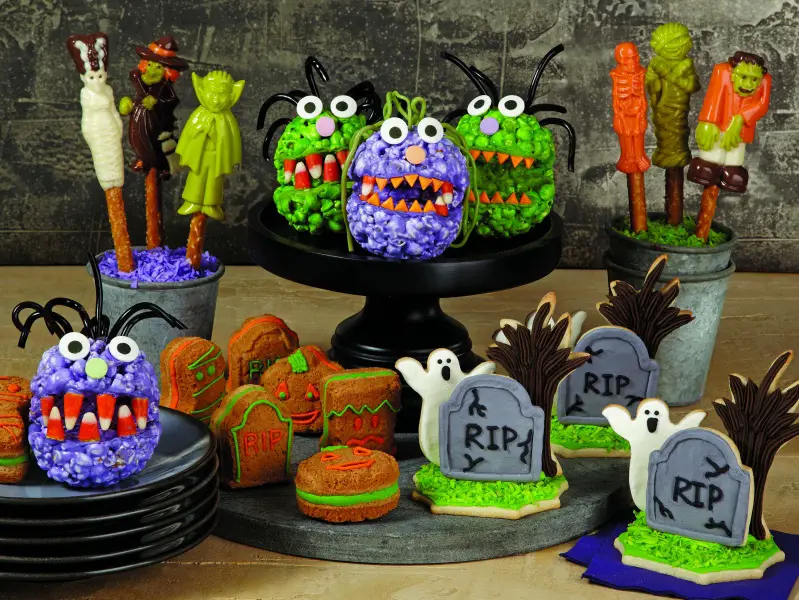
We don't know about you, but Halloween is one of our favorite holidays—and we're almost positive it's your kids favorite, too! And one of our favorite things about celebrating Halloween? Fun food that looks like creepy crawlies and ghoulish characters! Here's a list of Halloween-themed lunchtime options, desserts, and party treats that will make this Halloween extra-special—and help you get in the spooky spirit!
Halloween-Themed Lunch Recipes
Spooky Grilled Cheese
Recipe by Catherine McCord, the mom behind all those nutritious and fun recipes at Weelicious.com.

Serves 4
Ingredients
- Butter
- 8 slices pumpernickel or dark rye bread
- 4 slices cheddar cheese
Directions
- Heat butter in a griddle or skillet over medium heat.
- Using a Halloween-themed cookie cutter, cut the centers our of four slices of the bread.
- Place a slice of cheese on the four remaining pieces of bread and top with the cut-out bread slices.
- Place the sandwiches in the skillet, whole side down, and cook for three minutes.
- Flip and cook the sandwiches cut out-side down for two minutes or until golden and cheese has melted.
- Serve.
Monster Toes
Recipe courtesy Spoonful.com

Ingredients
- Cocktail wieners
- 6-inch tortillas
- Ketchup or mustard
- Toothpicks
Directions
- Heat the oven to 350 degrees. Cut a wedge into the end of each cocktail wiener to make a “toenail.”
- Cut the tortillas into strips about 4 inches long and 3/4 inch wide. Discard the ends.
- Soften the strips in the microwave between damp paper towels for 10-30 seconds.
- Roll each wiener in a tortilla strip and secure with a toothpick.
- Bake for 7-8 minutes. Remove them from the oven, then fill the toenail with ketchup or mustard. Remove the toothpicks before serving.
Mummy’s Fingers
Follow these simple step-by-step instructions for a tricky treat that is sure to have boils and ghouls in stitches. Courtesy of Barron's Educational Series © 2013 All Rights Reserved.
Ingredients
- Hot dogs
- Puff pastry
- Ketchup
- You will need
- Rolling pin
- Parchment paper
- Baking sheet
Directions
- Wrap thin strips of ready-made puff pastry around hot dogs to look like bandages.
- Place them on parchment paper on a baking sheet.
- Ask a grown-up to bake them in the oven for about 30 minutes, following the instructions on the pastry pack.
- When they are cooked cut them in half crosswise and add a dab of ketchup to the chopped end to look like blood.
Apple Monster Mouths
Recipe by Maryjane Cooke

Ingredients
- Apples
- Peanut butter
- Mini marshmallows
Directions
- Cut an apple into slices and drizzle with lemon juice to prevent browning.
- Spread peanut butter on one side of a slice, and place mini marshmallows on top of the peanut butter.
- Place peanut butter on another slice and top the marshmallow teeth.
Halloween-Themed Drink Recipes
Witches' Brew
Recipe by Catherine McCord, the mom behind all those nutritious and fun recipes at Weelicious.com.
Serves 4
Ingredients
- 2 cups apple cider
- 2 cup cranberry juice
- 1 stick cinnamon
- 1 tbsp lemon juice
Directions
- Place all ingredients in a pot and simmer on the stove for 10 minutes.
- Serve.
Rotten Apple Punch
Recipe courtesy Spoonful.com

Ingredients
- Apple cider (adjust the amount for the number of people you plan to serve; we suggest at least 1 gallon)
- Five ½-cup containers (we used Pyrex glass dishes; other small containers or cups will also work)
- Red and green food coloring
- 10-15 gummy worms
- Punch bowl
Directions
Helpful Tip: Do steps 1 and 2 the day before serving the punch.
- Pour apple cider into all 5 small dishes, stopping about ½ inch from the top. Add 2 drops of red and 1 drop of green food coloring to each dish and stir until the colors have blended.
- Hang 2 or 3 gummy worms around the edge of each dish and place the dishes in the freezer. If you use more than 3 worms, the rotten apples won't float as well. Freeze until the rotten apples are solid.
- Just before serving, slip the frozen wormy apples out of the dishes by setting them briefly in a few inches of warm water in your sink.
- Float the rotten apples in a large punch bowl filled with untinted cider. For added creepiness, drape the gummy worms over the edges of your serving bowl.
Witches Brew
Laura Fuentes, founder of MOMables.com, created this fun witches brew recipe for her kids’ lunchbox. The recipe became so popular among her kids’ schoolmates that she made the drink for the entire class.
Whether you are hosting a Halloween party or need to bring a treat to your child’s class, this witches brew recipe for kids will be a huge hit! It’s fun, the kids can drink it right away, and it’s a healthy alternative to store-bought candy, cookies, and other sweet treats.
If you want to include this witches brew as a fun treat in their lunchbox, just freeze the brew the night before (leaving ½ inch at the top for expansion) and pack it inside the lunchbox still frozen. By lunchtime, it will have thawed enough to make a great slushy!
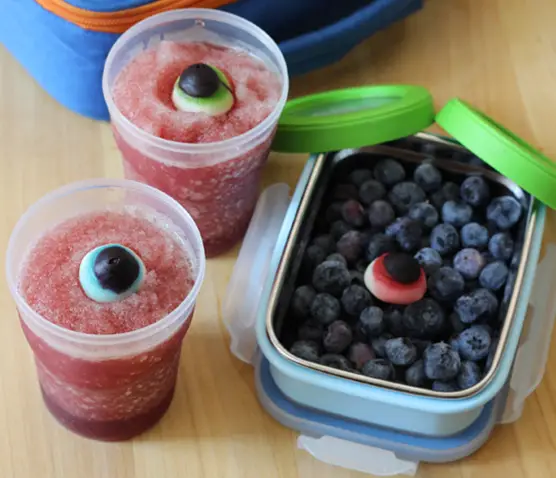
Serves 2
Ingredients
- 2 cups ice
- ¼ cup lemonade
- ½ cup grape juice
- 2 gummy eyeballs (or similar)
Directions
- In a blender, place ice, lemonade, and grape juice. Blend until it becomes a thick slush.
- Pour witches brew into individual cups, top with gummy eyeballs, and serve.
Spooky Smoothie
Yield: 4 servings
Ingredients
- 3 cups low-fat vanilla milk
- Orange food color
- 1½ cups low-fat vanilla Greek yogurt
- 5 cups ice cubes
- ¼ cup fat-free whipped cream
- Candy corn for garnish, optional
Directions
- In a blender, combine vanilla milk, yogurt, and ice cubes. Blend on high speed until smooth and creamy.
- Pour into serving glasses. Top with whipped cream and candy corn.
Monster Mash Mudslide
Yield: 4 servings
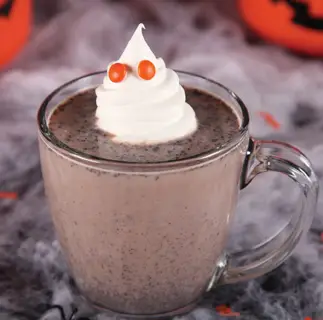
Ingredients
- 4 cups low-fat chocolate milk
- 10 chocolate wafer cookies, coarsely broken
- ½ cup frozen non-dairy whipped topping, thawed
- 8 mini chocolate chips or mini chocolate candies (orange/brown color recommended)
Directions
- In a blender, blend chocolate milk and chocolate wafer cookies until smooth. Heat mixture in saucepan or microwave until just heated through.
- To serve, pour chocolate milk mixture into 4 glasses. For each serving, spoon a large, upright dollop of whipped topping to resemble a ghost. Insert chocolate chips or chocolate candies into dollop for eyes.
Note: To enjoy a cold mudslide, do not heat in a saucepan or microwave.
Yummy Mummy Chocolate Milk Banana Smoothie
Courtesy Liz Weiss, R.D., co-author of The Moms' Guide to Meal Makeovers
Makes 4 Servings (1 cup each)
Ingredients
- 2 cups low-fat chocolate milk
- 2 ripe bananas
- 2 tablespoons peanut butter
- 1 cup ice cubes (about 10 cubes)
Directions
- Place the chocolate milk, bananas, peanut butter and ice cubes in a blender and process until smooth.
- Pour into four individual glasses and serve with a fun straw.
Halloween-Themed Cookie Recipes
Día de Los Muertos Cookies
One of the best parts of living in NYC is constantly experiencing the different cultures that surround us. I spent some time living in Mexico, and I fell in love with all of the colorful and lively skeleton trinkets. I wanted to bring these beautiful skeletons, a symbol of Día de los Muertos, to NYC by creating these cute and colorful skeleton cookies, not only for this Mexican holiday, but also as a fun Halloween treat. Recipe by Clarice Lam, founder of The Baking Bean.

Making the Sugar Cookie Dough
Yield: 12 (3 inch x 3 inch skeleton) cookies
Ingredients
- 2 sticks (1 cup) unsalted butter, room temperature
- 1 cup sugar
- 1 egg, lightly beaten
- ½ tsp. vanilla
- 3½ cups flour
- ¼ tsp. salt
- ¾ tsp. baking powder
Directions
- In a mixer bowl fitted with a paddle attachment, cream together the butter and sugar. Using a rubber spatula, scrape down the sides of the bowl. Slowly add the egg little by little, scraping down the sides of the bowl after each addition. Once fully mixed in, add the flour, salt, and baking powder. Continue to mix until a dough forms.
- Separate the dough into 2 pieces and roll each piece in between 2 sheets of parchment paper to ¼-inch thickness. Place the sheets into the freezer and chill for at least half an hour.
- Preheat the oven to 350 degrees. Remove one of the dough sheets from the freezer, peel off one side of the parchment, flip it over, and peel off the other piece of parchment. Using your cookie cutter, stamp out your cookies and place on a baking sheet lined with parchment paper. Bake for 10-12 minutes until golden brown around the edges. Remove from the oven and let cool.
Tip: You can re-roll the dough scraps one more time and save in the freezer for up to 6 months for freshly baked cookies any time.
Making the Royal Icing
Yield: 1 quart
Ingredients
- 1 lb. box confectioners’ sugar
- ¼ tsp cream of tartar
- 3 egg whites
- Water
Directions
- In a mixer bowl fitted with a whisk attachment, combine the confectioner’s sugar, cream of tartar, and egg whites. Whisk on high for 1-2 minutes or until stiff. Add water a little at a time to adjust the fluidity of the icing.
- Tip: You can save the royal icing in an airtight container in the fridge for up to 3 days. Use thicker royal icing when you want to create thin lines.
Decorating the Cookies
- Fit a pastry bag with a small round piping tip and fill with several spoonfuls of white royal icing. Starting with the head, draw a skull shape and fill, then create the sternum down the center. Repeat on the rest of your cookies.
- Pipe the shoulders and arms and then add 3 ribs to each side, and finally the leg bones. Repeat on all cookies.
- Mix a drop of black food coloring into a few spoonfuls of royal icing and mix. Fill a new piping bag with the grey icing. Pipe the cavities for the eyes and dots all around, then an upside-down heart for a nose, skull decorations, and the mouth/teeth. Dot the ends of each bone and all down the center of the sternum. Repeat on all cookies.
- Mix a couple drops of pink food coloring into a few spoonfuls of royal icing and mix. Fill a new piping bag with the pink icing. Pipe a heart in the center of the skull and freckles on the cheeks. Repeat on all cookies.
Easy Halloween Cookie Cups
Recipe by Jenny Harper is Consumer Test Kitchen Project Manager for the Nestle Test Kitchens and VeryBestBaking.com.
Makes 2 dozen cookie cups
Ingredients
- 1 package (16.5 ounces) cookie dough, like Nestle Toll House Refrigerated Chocolate Chip Cookie Bar Dough
- 1 cup (6 ounces) chocolate and peanut butter chips, like Nestle Toll House Swirled Milk Chocolate & Peanut Butter Morsels
Directions
- Preheat the oven to 350 degrees. Grease 24 mini-muffin cups.
- Place squares of dough into prepared muffin cups; press down to make a deep well.
- Bake for 9 to 11 minutes or until edges are set. Remove from oven to wire rack(s). While still warm, fill cookie cups with morsels. Morsels will soften and retain their shape. Cool completely. With the tip of a knife, remove cookie cups from muffin pan(s).
*Note: 1 cup (6 ounces) of any flavor Nestle Toll House morsels can be substituted for the Swirled Milk Chocolate & Peanut Butter Morsels.
Jolly Jack-o-Lantern Cookies
Recipe courtesy wilton.com
Makes about 2 dozen cookies
Ingredients
- 1 cup (2 sticks) butter, softened
- 1½ cups granulated sugar
- 1 egg
- 1½ teaspoons vanilla extract
- ½ teaspoon almond extract (optional)
- 2 ¾ cups all-purpose flour
- 1 teaspoon salt
- Light green, black, red, and orange sparkle gel
Directions
- Preheat the oven to 350 degrees. Lightly spray Easy Decorate Pumpkin Cookie Pan (or similar pan) with vegetable pan spray.
- In a large bowl, beat butter and sugar with an electric mixer at medium speed until well blended. Beat in egg and extracts; mix well. Combine flour and salt; add to butter mixture. Beat until well blended. Press dough into cavities, filling two-thirds full.
- Bake for 10-12 minutes or until light brown around the edges. Cool in pan for 10 minutes. Turn pan over; lightly tap pan to remove cookies. Cool completely on a cooling grid.
- Decorate cooled cookies with sparkle gel, using light green for stem; black for eyes, mouths and mustaches; red for tongue; and orange for remaining pumpkin areas. Let set, about half an hour.
Flying Saucer Cookies
Courtesy Hershey Kitchens
Ingredients
- ½ cup (1 stick) butter or margarine, softened
- 1¼ cups sugar
- 1 tablespoon water
- 1 teaspoon vanilla extract
- 1 egg
- 1½ cups all-purpose flour
- ½ cup Hershey's Special Dark Cocoa or Hershey's Cocoa
- ½ teaspoon salt
- ¼ teaspoon baking soda
- About 2 cups Reese's Pieces candy
Directions
- Heat oven to 325°F. Beat butter, sugar, water and vanilla in a large bowl until well blended. Add egg; beat well.
- Stir together flour, cocoa, salt and baking soda. Gradually add to the sugar mixture, beating until well blended.
- For each cookie, roll 1 level measuring tablespoon dough into a ball. Place on an ungreased cookie sheet and flatten to make a 2-inch circle. Alternating colors arrange 3 brown, 3 yellow and 3 orange candies to form a circle along the outside edge of the cookie. Pinch off pea-sized pieces of dough (level 1/4 measuring teaspoon); roll in ball. Flatten the ball and place it in the center of the circle formed by the candies.
- Bake for 10 minutes or until cookie edges are set. Cool slightly; remove from cookie sheet to wire rack. Cool completely. Makes about 3 dozen cookies.
Goblin Delights
For kids, Halloween is all about dressing up in costumes and collecting enough candy to last them until Christmas. Why not make obtaining Halloween treats more of a family affair by heading over to the kitchen and cooking up your own festive sweets. Try this quick and easy recipe for chocolate Goblin Delights. Courtesy the National Confectioners Association.
Ingredients
- 3 6-ounce packages semi-sweet chocolate chips
- 1 14-ounce can sweetened condensed milk
- 2 teaspoons vanilla extract
- 1½ cups chopped, dried mixed fruit (type used for fruit cake)
- dash of salt
Directions
- Line the bottom of a 9-inch square pan with waxed paper.
- Put chocolate chips, milk, and salt into the saucepan. Melt mixture over low heat, stirring
- constantly. When the mixture is completely melted, remove from heat.
- Add vanilla and fruit. Stir with a wooden spoon to blend the mixture thoroughly.
- Pour mixture into a lined pan and spread evenly with a rubber spatula.
- Place the pan in the refrigerator for at least 2 hours.
- After it's chilled, invert onto a cutting board and cut into 1-inch squares. Create different shapes by rolling squares in your hands or flattening them, short, round, be creative.
Chomping Vampire Cookies
Courtesy of Spoonful.com
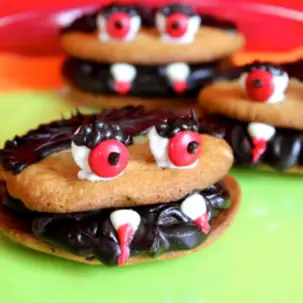
Prep Time: 1 hour
Ingredients
- 1 package (16 oz.) Pilsbury Ready To Bake! Refrigerated Chocolate Chip Cookies
- Gel food color, red
- 1 container ready-to-spread frosting (any white variety)
- 1 container ready-to-spread frosting (any chocolate variety)
- ¼ cup white vanilla baking chips
- Miniature marshmallows
- Candy-coated chocolate candies, red
- Water
Directions
- Heat oven to 350 degrees. On an ungreased cookie sheet, place cookie dough rounds 2 inches apart. Bake for 12-16 minutes or until the edges are light golden brown. Cool 2 minutes; remove from cookie sheet to cooling rack. Cool completely, about 10 minutes.
- Create a red glaze for the "blood"-tipped teeth. In a small bowl, mix about 1 tablespoon of white frosting with enough red gel food coloring to reach the desired "blood" color. Add water, a few drops at a time, and stir until the frosting is the consistency of school glue. Dip the pointed ends of white baking chips into the red glaze. Set aside to dry.
- Spoon chocolate frosting into a resealable food-storage plastic bag. Cut 1/2 inch off one corner of the bag, and pipe the frosting on the bottom of 1 cookie. Press another cookie, flat side down, on frosting at an angle, cookies touching on one side and about 1 inch apart on the other, to look like an open mouth.
- Prepare two more frosting bags for decorating the cookies, one with white frosting and one with chocolate frosting. However, this time only snip a tiny piece off of the corner of the bag.
- To decorate, press "blood"-tipped white vanilla baking chips in frosting for teeth. (Tip: A toothpick may be helpful to adjust placement.) For the eyes, squish mini marshmallows between your fingers so that they are slightly flattened. Use white frosting to attach marshmallow eyes to the top cookie. Then attach red candy-coated chocolates to the marshmallows. Pipe chocolate frosting into the center of the eye and to make eyebrows. You can also use a toothpick to add more of the red glaze "blood" to drip off of one of the teeth.
- Pipe chocolate frosting onto the top cookie to make hair in a "widow's peak" style.
Peanut Butter 3D Sandwich Cookies
Courtesy wilton.com
Makes about 1 dozen sandwich cookies
Ingredients
- ¾ cup solid vegetable shortening
- ¼ cup creamy peanut butter
- ½ cup firmly-packed light brown sugar
- 1/3 cup granulated sugar
- 1 egg
- ½ teaspoon pure vanilla extract
- 1½ cups all-purpose flour
- Buttercream Icing
- Kelly Green, Orange Icing Color
Directions
- Preheat the oven to 325 degrees. Spray 3D Sandwich Pan with vegetable pan spray.
- In a large bowl, beat shortening and peanut butter with an electric mixer until light and fluffy. Add brown sugar and granulated sugar; mix well. Add egg and vanilla, mixing until smooth. Add flour; mix well. Press dough into pan cavities, filling two-thirds full.
- Bake for 10 to 12 minutes or until lightly browned. Remove from pan to cooling grid; cool completely.
- Meanwhile, tint portions of icing green and orange. To assemble cookies, spread icing on half of the cookies; sandwich with a second cookie. Pipe details with icing.
Halloween-Themed Cakes & Cupcakes
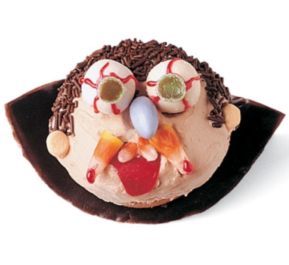
Little Green Monster Cupcakes
Make your favorite cupcakes and decorate them with smiling green monsters for a not-so-spooky but oh-so-festive Halloween treat. The little monsters are mostly marshmallow, but a few simple tricks turn them into mini Frankensteins! Recipe courtesy Spoonful.com.
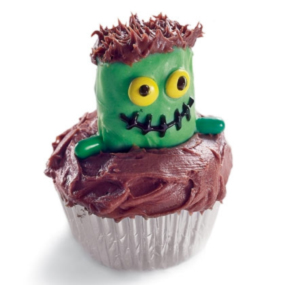
Ingredients
- 2 dozen cupcakes from your favorite recipe
- 3.4-ounce box of vanilla-flavored instant pudding
- Green food coloring
- 1 cup of green melting candy (we used Wilton Candy Melts)
- 24 large marshmallows
- Skewers
- Waxed-paper-lined baking sheet
- M&M's Minis
- Small serrated knife
- Chocolate frosting
- Black gel
- Green Tic Tac mints
Directions
- Bake and cool 2 dozen cupcakes from your favorite recipe. Prepare a 3.4-ounce box of vanilla-flavored instant pudding. Stir in drops of green food coloring until you have a shade you like, then place it in the refrigerator to chill.
- Next, microwave 1 cup of green melting candy (we used Wilton Candy Melts, available at party supply stores) for 1 minute at 50 percent power, then stir. If necessary, heat in 15-second intervals until completely melted. One at a time, spear 24 large marshmallows with a skewer and roll them in the melted candy, coating the sides. Set them on a waxed-paper-lined baking sheet, add M&M's Minis for eyes, and place them in the refrigerator to chill.
- With a small serrated knife, remove a 1-inch-wide chunk from the center of each cupcake. Fill each hole with a tablespoon or so of the pudding, then spread chocolate frosting around each pudding hole.
- Cover each pool of pudding with a chilled marshmallow. Add black gel facial features and 2 green Tic Tac mints for bolts.
- Finally, top each monster head with a bit of frosting and muss with your finger or a fork. Keep the cupcakes chilled until serving time.
Skull and Crossbones Cakes
Recipe courtesy wilton.com

Skull Cakes
Makes 8 skulls
Ingredients
- 4 cups all-purpose flour
- 2 2/3 cups granulated sugar
- 1 tablespoon ground cinnamon
- 2 teaspoons baking powder
- 1 teaspoon baking soda
- ½ teaspoon salt
- ½ teaspoon ground cloves
- Pinch ground nutmeg
- 1 1/3 cups vegetable oil
- 4 eggs
- 2 cups applesauce
- Buttercream icing
Directions
- Preheat the oven to 325 degrees..
- Spray Dimensions Mini Skull Pan (or similar pan) with vegetable pan spray.
- In a large bowl, combine flour, sugar, cinnamon, baking powder, baking soda, salt, cloves, and nutmeg. In a small bowl, whisk together oil, eggs, and applesauce. Add to dry ingredients, stirring until well combined.
- Fill each cavity in the pan about two-thirds full with ? cup batter. Reserve remaining batter.
- Bake for 30-35 minutes or until a toothpick inserted in the center comes out clean. Cool in pan for 15 minutes. Remove to a cooling grid and cool completely.
- Bake remaining batter as above.
- To assemble, cut the domes off of the fronts and backs of skulls and sandwich with buttercream icing.
Cookie Bones
Makes about 3 dozen cookies
Ingredients
- 1 cup (2 sticks) butter, softened
- 1½ cups granulated sugar
- 1 egg
- 1½ teaspoons vanilla extract
- ½ teaspoon almond extract (optional)
- 3 cups all-purpose flour
- 1 teaspoon salt
Directions
- Preheat the oven to 350 degrees. Lightly spray Bones Cookie Pan (or similar pan) with vegetable pan spray.
- In a large bowl, beat butter and sugar with an electric mixer at medium speed until well blended. Beat in egg and extracts; mix well.
- Combine flour and salt; add to butter mixture. Beat until well blended.
- Press dough into prepared pan cavities, filling two-thirds full.
- Bake for 9-10 minutes or until light brown around the edges. Cool in pan for 10 minutes. Turn pan over; lightly tap pan to remove cookies. Cool completely on a cooling grid.
To decorate and assemble, you'll need:
- Yellow candy color from Primary Candy Color Set, optional
- 3 (12-ounce) bags White Candy Melts Candy, melted
- 1 (12-ounce) bag Black Candy Melts Candy, melted
- Large Candy Eyeballs
- Brown Color Dust, optional
Directions
- Place assembled cakes and cookies on a cooling grid, positioned over the cookie sheet. If desired, add yellow candy color to melted white candy; pour over cakes and cookies until well coated. Chill 10-15 minutes or until set. Repeat if needed.
- Using a disposable decorating bag, pipe melted black candy face details on skull cakes; chill 5-10 minutes or until set. Attach candy eyeballs to skulls with dots of melted candy. If desired, brush Color Dust highlights on candy-covered bones and skulls.
- Using melted white candy, secure four decorated skull cakes to the cake base or serving platter, hold until set; insert decorated bone cookies between cakes. Add a second row of skulls, positioning between the skulls below and securing with melted candy; hold until set. Add bone cookies between skulls. Secure final skull to top of tower with melted candy; hold until set. Arrange remaining bone cookies around the base of the cake tower.
Spirited Pumpkin Cake Pops
Recipe courtesy wilton.com
Ingredients
- 1 package (15.5 to 18.25 ounces) yellow cake mix
- Water, eggs, and oil (as called for in cake mix directions)
- Orange, black, and white candy melts
- Black/white colored lollipop sticks
- Candy eyeballs
Directions
- Preheat the oven to 350 degrees. Prepare 12-cavity Silicone Petite Pumpkin Mold (or similar pan) with vegetable pan spray.
- Prepare cake mix by following package instructions; fill silicone mold cavities two-thirds full with cake batter. Bake for 8-12 minutes or until a toothpick inserted in the center comes out clean. Remove from mold and cool completely.
- Melt orange candy melts by following package instructions. Dip lollipop sticks in melted candy; insert into bottom of cakes. Using a spatula or butter knife, spread melted candy onto the backs of cakes; chill in the refrigerator for 5-10 minutes or until set. Place cooled cakes on a cooling grid positioned over the cookie sheet, candy side down; spoon or pipe melted candy over cakes until well coated. Chill in the refrigerator for 10-15 minutes or until set. Repeat if desired.
- Melt black candy melts in a disposable decorating bag; cut a small hole in the tip of the bag and pipe mouth, nose, and eyebrows on pumpkins. If desired, pipe melted white candy teeth. Attach candy eyeballs with dots of melted candy.
Cobweb Cupcakes
Courtesy meals.com
Serves 24
Ingredients
- 1 package (18.25 ounces) devil's food or yellow cake mix
- 2 (2.1 ounces each) Nestlé Butterfinger Candy Bars, chopped
- 1 container (16 ounces) prepared vanilla frosting
- 1 cup (6 ounces) Nestlé Toll House Semi-Sweet Chocolate Morsels
- 1 small tube white decorator icing or gel
- 1 package (1.38 ounces) Nestlé Goobers Milk Chocolate-Covered Peanuts
Directions
- Prepare cake mix batter according to package directions; add chopped Butterfinger to batter. Bake according to directions for 24 cupcakes. Cool completely. Frost cupcakes.
- Place morsels in a small, heavy-duty plastic bag. Microwave on HIGH (100%) power for 45 seconds; knead. Microwave at additional 10- to 15-second intervals, kneading until smooth. Cut a small corner from the bag; squeeze to pipe concentric circles on top of frosting. Using a wooden pick or tip of a knife, pull the tip through chocolate from the center to the last circle to create a cobweb effect.
- Make 2 dots using decorator icing on each of 24 Goobers to resemble spider eyes. Place in the center of each cobweb.
Back From the Grave Cake
Courtesy wilton.com
Makes about 12 servings
Ingredients
- 2¾ cups all-purpose flour
- 2 teaspoons baking powder
- 1½ teaspoons ground cinnamon
- ¼ teaspoon salt
- 1 cup (2 sticks) butter, softened
- 1¼ cups granulated sugar
- 3 eggs
- 2 teaspoons vanilla extract
- ¾ cups sweetened applesauce
- 1¼ cups diced Granny Smith apple (about 1 medium apple)
- 1 can (16 ounces) White Decorator Icing
Directions
- Preheat the oven to 325 degrees. Prepare a 3D Skeleton Casket pan with vegetable pan spray.
- In a medium bowl, combine flour, baking powder, cinnamon and salt; set aside. In a large bowl, beat butter and sugar with an electric mixer until light and fluffy. Add eggs, one at a time, and vanilla; mix well. Alternately add flour mixture and applesauce to butter mixture. Spread about half of cake batter so that it reaches the first horizontal line inside the pan. Sprinkle diced apples evenly over batter. Top with remaining batter, smoothing out the top.
- Bake 58 to 62 minutes, or until a toothpick inserted in the center of the cake comes out clean. Cool 15 minutes; remove from pan and cool completely on cooling grid.
- Decorate cooled cake with tip 5 and decorator icing.
Spooky Pop Cupcakes
Courtesy wilton.com
Each cupcake serves 1
Ingredients
- Graveyard Cupcake Decorating Set, Spooky Pop Cupcake Combo Pack or solid color baking cups
- Favorite cupcake recipe or mix
- 1 can (16 ounces) White Decorator Icing
- Orange, Green or other desired Icing Color
- 1 can (16 ounces) Chocolate
- Decorator Icing
Directions
- Preheat the oven to 350 degrees. Line cavities of the standard muffin pan with baking cups.
- Bake your favorite cupcakes in a prepared pan. Cool completely. Place some cupcakes in Skeleton Cupcake Wraps. Tint white decorator icing with icing color. Use a spatula to ice smooth or pipe tip 1M icing swirls on cupcake top. Insert icing decorations or pix from the decorating set and combo pack.
Vampire Cupcake
Courtesy of Spoonful.com
Ingredients
- 1 cupcake (any flavor)
- White frosting
- Grape and strawberry fruit leather
- Chocolate jimmies
- 2 orange mini marshmallows
- 1 purple Jordan almond
- 1 green gumdrop, halved
- 1 white gum ball, halved
- Red gel icing
- 4 candy corns
Directions
- Turn the unwrapped cupcake upside down and frost. Set on a cape made from the grape fruit leather.
- Use the jimmies for hair, the marshmallows for ears, the almond for a nose and the gumdrops—placed on the gum balls—for eyes (make them bloodshot with gel icing). The teeth are candy corn with red gel blood, and the tongue is strawberry fruit leather.
Gravestone Brownies
Recipe by Catherine McCord, the mom behind all those nutritious and fun recipes at Weelicious.com.
Makes 14 "graves"
Ingredients
- ¾ cup all-purpose flour
- ¾ cup cocoa powder
- ¾ tsp salt
- 15 tbsp unsalted butter, melted
- 1½ cups sugar
- 2 tsp vanilla extract
- 3 large eggs
- ½ cup semisweet chocolate, chopped (you can also use chocolate chips)
Directions
- Preheat the oven to 325 degrees.
- Whisk the first three ingredients in a bowl and set aside.
- In a standing mixer or bowl, whisk the melted butter, sugar, and vanilla.
- Whisk in the eggs one at a time until combined, then slowly mix in the dry ingredients.
- Pour the batter into a greased and parchment-lined 9-by-13-inch baking dish and bake for 30 minutes.
- Cool, cut into bars*, and top with "gravestones".
To make gravestones: Cut gray construction paper into stones and decorate as desired. Place a toothpick on the backside of the stone and attach with a piece of tape, then poke the gravestone toothpick into the brownie.
Note: When cutting your brownie, use a long serrated knife and wipe it off in between cuts.
Recipes for Halloween Party Snacks
Pumpkin Shaped Crispy Treats
While this spin on Rice Crispy Treats calls for vegan marshmallows and margarine, feel free to substitute with your favorite brands. Recipe by Chelsie Jangord.

Ingredients
- 1 10oz bag of Dandies Pumpkin Marshmallows
- 2 Tbsp vegan
- 2 Tbsp Pure Maple Syrup
- 5 cups Crisp Rice Cereal
- Black licorice nibs
- Orange Food Coloring (optional)
Instructions
- In a microwave safe bowl, combine Dandies, margarine, and maple syrup. In 30 second intervals, with a quick stir between each, microwave until marshmallows are fully melted. Optionally you can add a few drops of orange food coloring to make the orange color more intense.
- Mix in cereal and stir until evenly coated with marshmallow cream. Shape mixture into pumpkin shapes and stick a licorice nib in the top for a stem. Let cool and enjoy!
Candy Corn Marshmallows
These “boo”-friendly Candy Corn Marshmallows are one of the easiest treats you can make and only require a few ingredients. They make a super fun treat for any candy-seeking trick-or-treaters, and your kids are guaranteed to love them too. Excerpted from Kids' Treats: 50 Easy, Extra-Special Snacks to Make with Your Little Ones. Copyright © 2015 by Katie Wyllie and published by F+W Media, Inc. Used by permission of the publisher. All rights reserved. Photo courtesy Katie Wyllie.
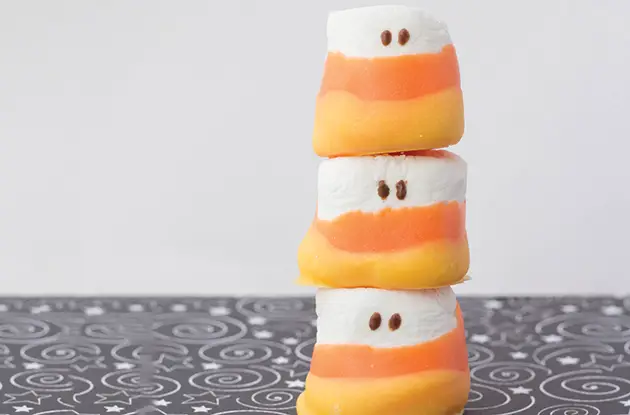
Makes: 12
Ingredients
- ½ cup orange chocolate candy melts
- 12 marshmallows
- ½ cup yellow chocolate candy melts
- ½ cup brown chocolate candy melts
Directions
- Melt the orange chocolate candy melts in a candy melting electric pot according to the package instructions, or in the microwave at 30-second increments.
- Dip the bottom half of each marshmallow into the orange chocolate candy melts.
- Place marshmallows in the refrigerator until chocolate hardens, approximately 5 minutes.
- Melt the yellow and brown chocolates (separately) as in Step 1. Dip the bottom quarter of the orange-covered marshmallow in the yellow chocolate to create a candy corn look. Place in the refrigerator until chocolate has hardened, approximately 2–3 minutes.
- Dip a toothpick or the bottom end of a cake-decorating paint brush into your brown chocolate candy melts, and then use it to dot two eyes on the remaining white portion of the marshmallows. Place marshmallows on parchment paper and store in the refrigerator until chocolate has hardened, approximately 2-3 minutes.
Monster Marshmallows
These marshmallows are an adorable treat that will let your kids’ creativity fly! This recipe is so easy for little kids to do and there’s something so special about seeing the pride your children have in their own monster creations. My little guy loved dipping marshmallows in the chocolate and then in the sprinkles, and he had a great time doing it! Which is just what your kids will have, too. Excerpted from Kids' Treats: 50 Easy, Extra-Special Snacks to Make with Your Little Ones. Copyright © 2015 by Katie Wyllie and published by F+W Media, Inc. Used by permission of the publisher. All rights reserved. Photo courtesy Katie Wyllie.
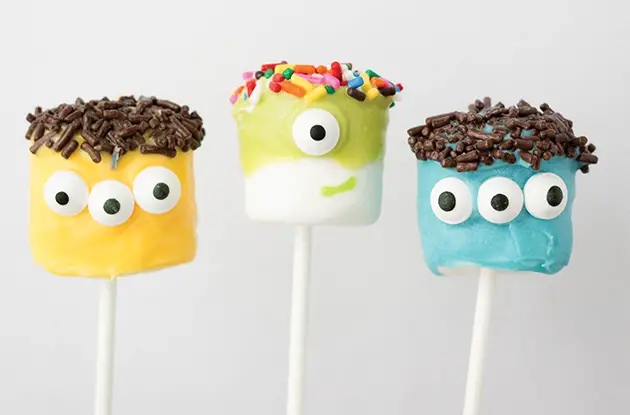
Makes: 6
Ingredients
- ½ cup each blue, green, and yellow candy melts, or colors of your choice
- 6 lollipop sticks
- 6 marshmallows
- ¼ cup assorted sprinkles, nuts, or other toppings
- 18–20 candy eyes
Directions
- Place your candy melts in three different bowls and melt according to package instructions or in the microwave at 30-second increments.
- Insert your lollipop sticks into the bottom of your marshmallows.
- Dip the top half of marshmallows into the melted candy melts in your desired colors.
- Place your sprinkles, nuts, and other toppings in small bowls. While the chocolate is still hot, dip your marshmallows into desired sprinkles and add your candy eyes—as many as your child wants—by applying a small amount of melted chocolate to the back of the eye with a toothpick before sticking onto the marshmallow.
- Place monster treats on parchment paper and store in the refrigerator until chocolate hardens, approximately 5 minutes.
Monster Rice Cereal Treats
Rice cereal treats are one of the easiest treats you can make, which is great because, when creating anything with kids, simple is always best. These Halloween-themed rice cereal treats put on a monster of a costume for the season and are a favorite among kids! Sometimes the best treats are the easiest—and the ones that are the most fun—to make. Excerpted from Kids' Treats: 50 Easy, Extra-Special Snacks to Make with Your Little Ones. Copyright © 2015 by Katie Wyllie and published by F+W Media, Inc. Used by permission of the publisher. All rights reserved. Photo courtesy Katie Wyllie.
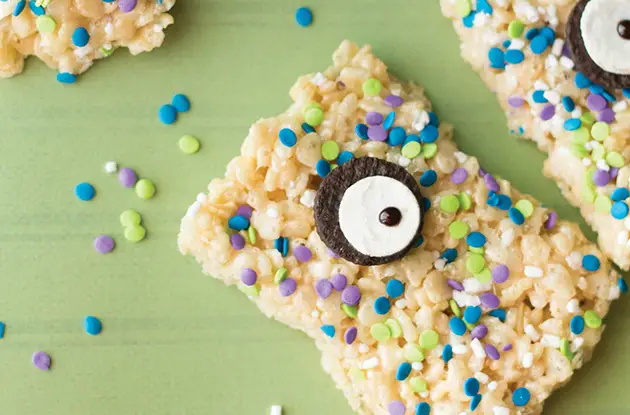
Makes: 12-18
Ingredients
- 3 Tablespoons butter
- 1 (10-ounce) package marshmallows
- 6 cups crispy rice cereal
- Cooking spray
- 1 Tablespoon sprinkles
- 12–18 mini Oreo cookies
- 1 (3.5-ounce) tube black glaze icing gel
Directions
- In a large saucepan, melt butter over medium heat. Add marshmallows and stir until completely melted. Remove from heat.
- Add rice cereal to butter and marshmallow mixture and stir to combine.
- Press mixture into a 13" × 9" pan coated with cooking spray. Sprinkle sprinkles on top.
- Allow rice cereal to cool for about 10–15 minutes and then cut into 2–3-inch squares.
- Separate your Oreos, trying to keep the cream on one side of the Oreo.
- Using your gel icing as glue, glue the opened Oreo (with cream) to the center top of the rice cereal treat. The cream side should be facing you. Apply a black dot of gel in the center of the cream to create an eyeball.
Cheese Wafer Fingers
Recipe by Catherine McCord, the mom behind all those nutritious and fun recipes at Weelicious.com.
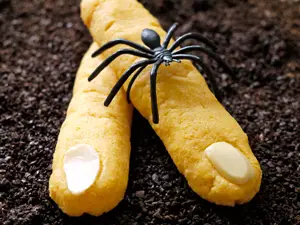
Makes about 20 two-inch Fingers
Ingredients
- ½ lb. or 2 cups sharp cheddar cheese, grated
- 5 tbsp unsalted butter, cut into cubes
- 1 cup all-purpose flour
- 1 cup raw almonds, slivered or whole blanched
Directions
- Preheat the oven to 375 degrees.
- Place all of the ingredients in a food processor and pulse to combine.
- Take a piece of dough and mold into a "finger," then place one slice of almond on the top of the tip for the "nail" (press almonds down well into fingers).
- Place fingers on a sheet pan and bake for 20 minutes. Let cool on sheet for two minutes before removing.
- Serve.
Popcorn Trail Mix
Recipe by Catherine McCord, the mom behind all those nutritious and fun recipes at Weelicious.com.
Ingredients
- 4 cups popcorn, popped
- ½ cup chocolate chips
- ½ cup dried cherries or cranberries
- ½ cup roasted mixed nuts, almonds, walnuts, or peanuts
Directions
- Place all of the ingredients in a bowl and combine.
- Place mixture into individual treat bags.
- Serve.
Spiderweb Munch
Recipe by Jenny Harper is Consumer Test Kitchen Project Manager for the Nestle Test Kitchens and VeryBestBaking.com.
Makes 12 servings
Ingredients
- 2 cups (12-ounce package) chocolate chips, like Nestle Toll House
- Semi-Sweet Chocolate Morsels
- 1 cup creamy peanut butter, divided
- 1/3 cup powdered sugar
- 3 cups toasted rice cereal
Directions
- Heat morsels and 3/4 cup peanut butter in a small, heavy-duty saucepan over low heat, stirring constantly until smooth; remove from heat. Add sugar; stir vigorously until smooth.
- Place cereal in a large bowl. Add 1 cup melted chocolate mixture; stir until evenly coated. Place on an ungreased baking sheet. Using a small metal spatula, shape into a 10-inch circle with a slightly raised 1-inch-wide border. Pour the remaining chocolate mixture in the center of the circle; spread to the border.
- For spiderweb: Place remaining peanut butter in a small, heavy-duty plastic bag. Cut a tiny corner from the bag; squeeze to pipe concentric circles on top of chocolate. Using a wooden pick or the tip of a sharp knife, pull the tip through peanut butter from center to border. Refrigerate for 30 minutes or until firm. Cut into wedges.
Forked Eyeballs
Recipe courtesy Spoonful.com
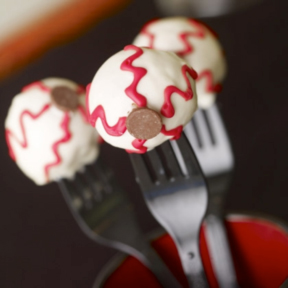
Ingredients
- 2 (11-ounce) bags white chocolate chips
- 12 doughnut holes
- Semisweet chocolate chips
- Tube of red decorator frosting
- 2 tablespoons vegetable oil
Directions
- To coat a dozen doughnut holes, melt the white chocolate chips with the oil over low heat (and keep the chocolate warm while you work). With a fork, spear each doughnut hole and submerge it in the melted chocolate to coat it, then gently tap off any excess.
- Stick a semisweet chocolate chip with its point cut off onto each doughnut hole, cut end first. Place the forks (handle side down) in a mug and allow the chocolate coating to harden.
- Use a tube of red decorator frosting to add squiggly veins radiating out from the pupils.
Popcorn Ball Monsters
Courtesy wilton.com
Each serves 1
Ingredients
- 1 jar (about 7 ounces) marshmallow crème
- Violet and Orange Icing colors
- 4 cups popped popcorn, divided
- White Candy Melts
- Candy, melted following package instructions
- Large Candy Eyeballs
- Animal and People Faces
- Sprinkle Sets, candy corn, Jumbo Confetti Sprinkles
- Green and Black Candy Strings
Directions
- Spray Dimensions Multi-Cavity Mini Pumpkin Pan cavities with vegetable pan spray.
- In a large microwave-safe bowl, microwave marshmallow crème 1 minute at 50% power. Remove bowl from microwave and divide marshmallow crème in half; stir icing color into each half (tint slightly darker than how you want your finished treat to look). Stir 2 cups of popped popcorn into each marshmallow mixture until evenly coated. Press popcorn treat mixture in bottom cavities only of pumpkin pan to 1 1/2 in. deep; reserve some unmolded popcorn. Let set.
- Attach 2 popcorn ball halves together on one edge, using unmolded popcorn to prop the opposite edge open. Using melted candy, attach Candy Eyeballs and sprinkles and candy corn teeth, and Jumbo Confetti nose. Attach candy strings for hair.
Extra-Terrestrial Snack Mix
Courtesy Hershey Kitchens
Directions
- 4 cups bite-size crispy wheat squares cereal
- 1/3 cup butter, melted
- 2 teaspoons sugar
- 3 cups dry roasted salted peanuts or sunflower kernels
- 1 cup dried sweetened cranberries
- 1 cup Reese's Pieces candy
Ingredients
- Stir together cereal and butter in a large bowl. Sprinkle sugar evenly over cereal.
- Stir in all remaining ingredients. Store in a tightly covered container. Makes about eight 1-cup servings.
Bewitching Cocoa Bites
Getting the kids into the kitchen to help with dinner can be torture, but getting them cooking might be more fun with this festive Halloween recipe for delicious, chocolate rice cereal treats. Plus, these Bewitching Cocoa Bites also make the perfect addition to any Halloween costume party. Courtesy the National Confectioners Association.
Makes about 40 treats
Ingredients
- 5 cups crisp rice cereal
- 6 tablespoons butter or margarine
- 3 cups miniature marshmallows or 30 large marshmallows
- 1 2/3 cups (10oz) Peanut butter chips
- 1/3 cup cocoa
- 1/3 cup light corn syrup
Directions
- Measure cereal; set aside. In a large saucepan over low heat, melt butter. Add marshmallows, peanut butter chips, and cocoa. Cook over low heat, stirring constantly, until marshmallows and chips are melted. Remove from heat.
- Stir in corn syrup. Add cereal; stir until well coated.
- Using hands, shape into 1 1/2 inch balls, stirring mixture a few times during shaping. Place on a cookie sheet. Cool completely. Decorate as desired. Store Cocoa Bites in a cool dry place.
Chocolate Witch Hair
Sure, candy is likely your kids' favorite Halloween treat, but why not cook up something a little different this year? Use this easy-to-make recipe to lure your children into the kitchen for a festive family activity that results in delicious chocolate witch hair. Courtesy the National Confectioners Association.
Ingredients
- 3 large shredded wheat bundles
- 1 6-ounce bag milk chocolate chips
- 3 tablespoons honey
- 1 tablespoon light brown sugar
- 2 tablespoons butter
Directions
- Break up the shredded wheat bundles into single long strands, so they have the appearance of hair. Set aside.
- Place the honey, brown sugar, chocolate chips, and butter in a saucepan and heat over a low flame to melt. Stir constantly. Mixture should be smooth and glossy.
- Remove from heat and gently stir in the shredded wheat.
- When the shredded wheat is completely coated, scoop it onto waxed paper in small equal portions. Use a fork to gently rake hairs into one direction. Place in the refrigerator for about 30 minutes.
Frankenstein's Frightening Chocolate Milk Raspberry Pudding
Courtesy Liz Weiss, R.D., co-author of The Moms' Guide to Meal Makeovers
Makes 6 Servings
Ingredients
- 2 cups low-fat chocolate milk, divided
- 1 cup frozen raspberries
- 3 tablespoons cornstarch
- 2 tablespoon unsweetened cocoa powder
- 2 tablespoons granulated sugar
- ¼ teaspoon salt
- 1 egg yolk
- Fresh raspberries, optional
Directions
- Place 1½ cups chocolate milk and raspberries in a blender and process until smooth. Strain the mixture into a medium saucepan. Bring to a boil.
- Whisk together the cornstarch, cocoa powder, sugar, and salt in a large bowl until well combined.
- Whisk together the remaining ½ cup chocolate milk and the egg yolk and add to the cornstarch mixture, stirring well.
- Slowly add half the hot milk to the egg yolk mixture, stirring with a whisk.
- Return the milk mixture to the pan and bring back to a boil. Reduce the heat and simmer, stirring constantly, for 1 minute or until thick.
- Spoon the pudding into 6 small bowls, cover the surface with plastic wrap and chill in the refrigerator.
- Serve with fresh raspberries on top as desired.
Boo Bread Pudding
Courtesy Liz Weiss, R.D., co-author of The Moms' Guide to Meal Makeovers
Makes 6 Servings
Ingredients
- 1½ cups low-fat chocolate milk
- 4 large eggs, beaten
- 2 tablespoons pure maple syrup
- 7 slices whole grain cinnamon swirl bread, sliced into ½-inch cubes (about 6 cups)
- 4 tablespoons dried cranberries, divided
- Confectioners’ sugar, optional
Directions
- Preheat the oven to 350 degrees. Lightly oil or coat an 8-by-8-inch baking pan or dish with nonstick cooking spray and set aside.
- Whisk together the chocolate milk, eggs, and maple syrup in a large bowl.
- Stir in the bread cubes and 2 tablespoons of the dried cranberries, and let stand at room temperature for 10 minutes. Stir occasionally to make sure all the bread is covered with the egg mixture.
- Arrange the mixture evenly in the prepared pan, top with the remaining cranberries, and bake for 35-40 minutes until puffed and set.
- Transfer to a wire rack and cool for 5 minutes before slicing. Sprinkle with confectioners’ sugar as desired.
Black and Orange Spook Cups
Recipe by celebrity caterer Andrea Correale, owner and creator of Elegant Affairs

Ingredients
- 1 qt. (4 cups) cold milk, divided
- 1 pkg. (4 serving size) JELL-O Chocolate Fudge flavor instant pudding
- 1 pkg. (4 serving size) JELL-O Vanilla Flavor instant pudding
- Red food coloring (a few drops)
- Yellow food coloring (a few drops)
- 10 Oreo Cookies, crushed
- ¼ cups Halloween sprinkles
- 10 glasses (7 oz.)
Directions
- Pour 2 cups of the milk into a large bowl. Add dry chocolate pudding mix. Beat with a wire whisk for 2 minutes or until well blended. Spoon evenly into the glasses, filling each glass half way; set aside.
- Add remaining 2 cups milk to a separate large bowl and add vanilla pudding mix. Beat with wire whisk for 2 minutes or until well blended. Stir in red and yellow food coloring until pudding is the desired shade of orange; spoon evenly over chocolate pudding layers. Top with crushed cookies.
- Refrigerate at least 1 hour or until ready to serve. Top with sprinkles.
Note: Pudding cups can be served frozen: Prepare in plastic or paper cups—NOT glass. Freeze for 3 hours or until firm.
Candy Corn Spoons
Recipe by celebrity caterer Andrea Correale, owner and creator of Elegant Affairs
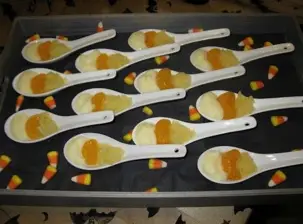
Ingredients
- Yogurt or pudding
- 1 mandarin orange, peeled and separated into slices
- A small can crushed pineapple, drained
- Large spoons
Directions
- Lay spoons out on a tray. Place a small dollop of yogurt or pudding on the spoon, close to the edge.
- Next to the yogurt, place a mandarin orange slice, then next to the orange, place some crushed pineapple.
Purple Jell-O Hand
Recipe by Maryjane Cooke
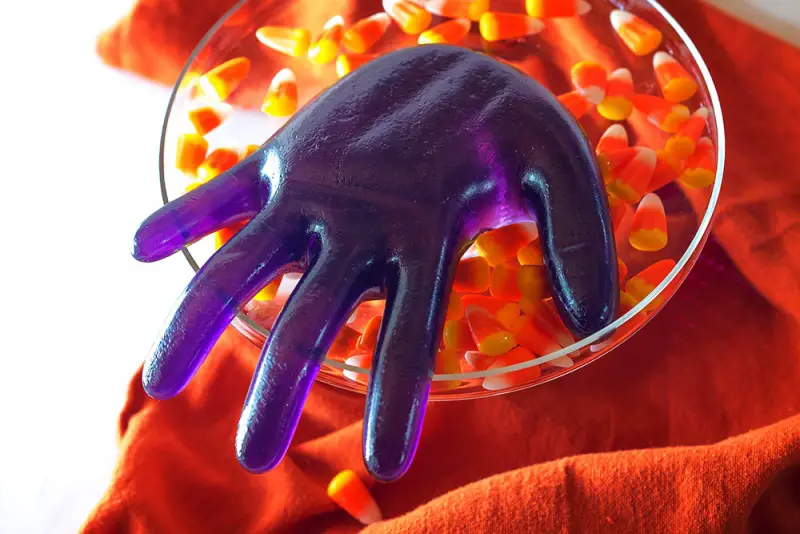
Ingredients
- Non-latex disposable glove
- Rubber band
- Vegetable spray
- 2 boxes grape Jell-O mix
- 2½ cups boiling water
Directions
- Use a non-latex disposable glove and spray the inside with vegetable spray.
- Mix Jell-O mix and boiling water together. Allow the hot liquid to cool just a bit before carefully pouring into the prepared glove.
- Place a rubber band tightly at the end of the glove and place in the fridge overnight.
- Cut the plastic glove off the hand when set, working on the bottom of the hand so any nicks won't be seen.
Wormy Jell-O
Recipe by Maryjane Cooke
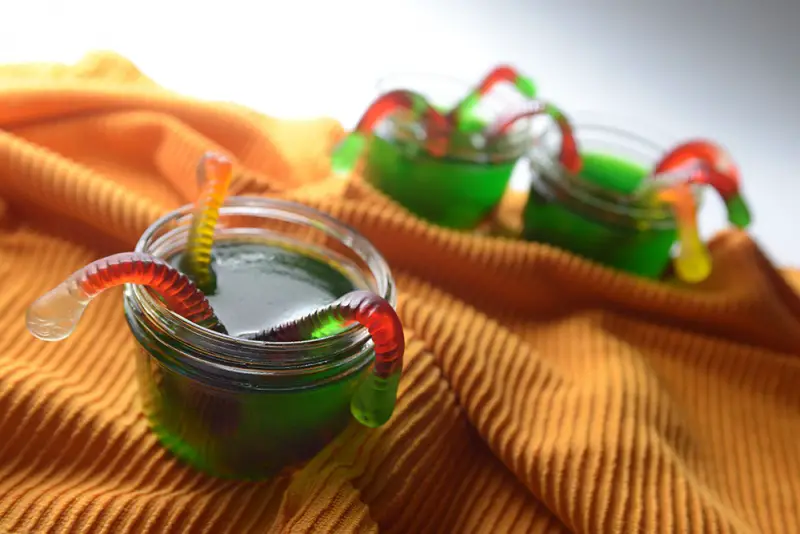
Ingredients
- 1 box green Jell-O mix
- Mason jars
- Gummy worms
Directions
- Prepare green Jell-O according to package instructions.
- Pour into mini mason jars and allow to set for 10 minutes in the fridge.
- Add gummy worms halfway into the partially set mixture and chill until completely set.


